
Saturday, December 25, 2010
Monday, November 22, 2010


Sunday, November 21, 2010


Sunday, April 4, 2010
Coconut macaroons
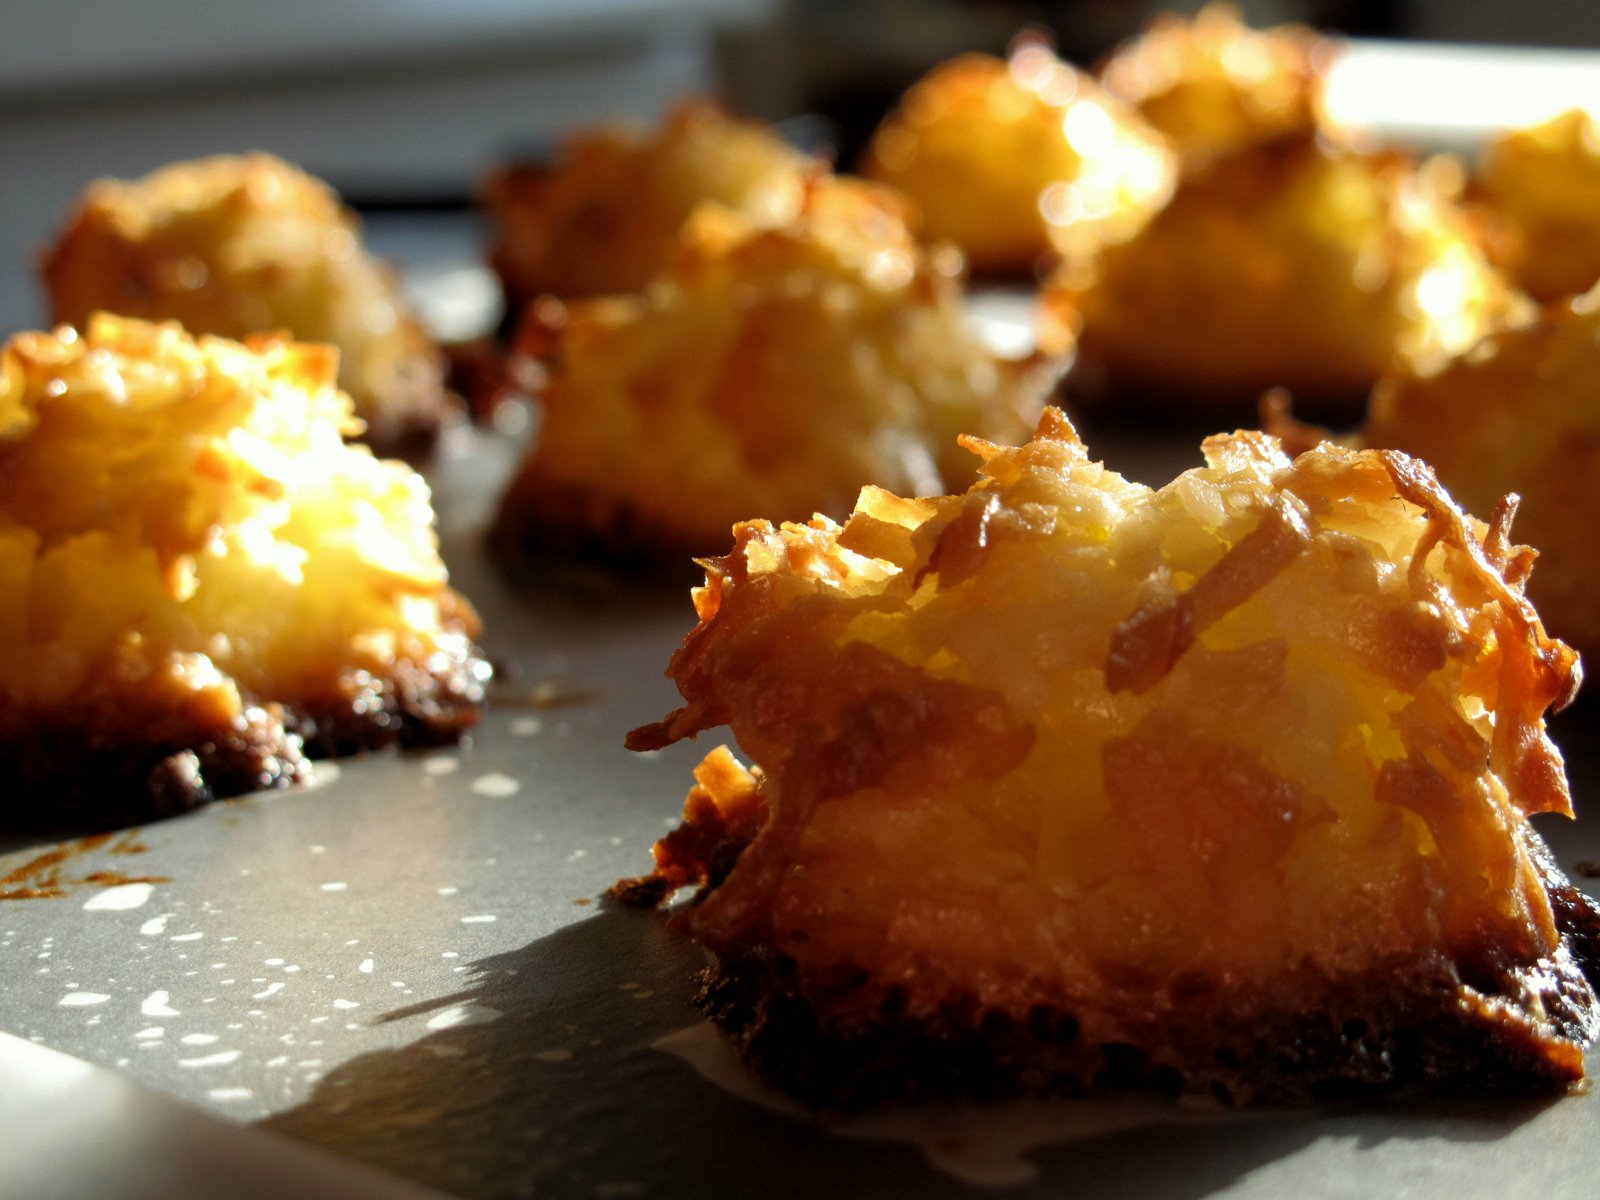
I have a couple of overdue posts, but I am skipping right to this one, since it's holiday-appropriate for Passover.
Although I usually tinker with recipes that I get online or from other people, I took this one almost word-for-word from epicurious.com (my favorite recipe website). You can find it here. It's simple, but very well balanced, and if you like coconut, you will love these macaroons. The only thing that I am on the fence about is the chocolate on top. I've previously made them with chocolate, but not this time, and I like them better without. I find that the chocolate messes up the delicate balance of flavors and makes the macaroons a bit too sweet, but that's just my palate - it's really a matter of taste. Also, S and I used clementine peel instead of orange peel, and it was an interesting, though very subtle, change.
Anyhoo, here's the recipe:
INGREDIENTS
1/2 cup (1 stick) unsalted butter, room temperature
3/4 cup sugar
1/8 teaspoon salt
2 teaspoons finely grated orange peel
3 large eggs
24 ounces sweetened flaked coconut (about 6 cups firmly packed)
6 ounces bittersweet chocolate, melted (optional)
METHOD
1. Position rack in center of oven; preheat to 325°F. Line 3 large rimmed baking sheets with parchment. Using electric mixer, beat butter in large bowl until smooth. Add sugar and salt; beat until blended. Beat in orange peel, then eggs, 1 at a time. Mix in coconut. Drop batter onto sheets by tablespoonfuls, spacing 1 1/2 inches apart.
2. Bake macaroons, 1 sheet at a time, until golden on bottom and browned in spots, 25 to 30 minutes. Cool completely on sheets.
3. (Optional) Using fork, drizzle chocolate over macaroons. Chill on sheets until chocolate is firm, about 30 minutes.
Monday, March 29, 2010

Wednesday, March 3, 2010
Tequila Lime Chicken with Mango Salsa

This a really quick and easy recipe, but it is packed with flavor. In fact, it's so simple that I used to make it constantly in college, when my culinary hardware consisted of a dorm-sized fridge, one pan, one spatula, and a defective electric stove in a shared kitchen. I thought of it recently, because in my quest to try different tequilas, I've acquired one that I don't particularly want to drink. Marinade was its destiny. To take the chicken up a notch from a college meal, S and I paired it with a mango salsa.
INGREDIENTS
For chicken:
2 lb chicken (thighs, drumsticks, breasts - anything you like)
1/2 cup tequila
1/2 cup olive oil
juice of 2 limes
1/2 bunch cilantro, chopped
4-6 cloves garlic, minced
1-2 jalapeno peppers, minced
For salsa:
1 large ripe mango, cubed
1 small red onion, chopped
1 small cucumber, chopped
1 jalapeno pepper, minced
3 cloves garlic, minced
1/2 bunch cilantro, chopped
juice of 1 lime
1. If using chicken breasts, tenderize them first. To do this, put each chicken breast between two large sheets of saran wrap, press around the chicken to seal. Place the chicken, one breast at a time, on the counter, and pound it with a heavy skillet until you get tired. Take care to prevent/clean up any rogue chicken juice leakage.
2. Mix the remaining ingredients in a large container (1 gallon ziplock bag works best). Add the chicken. Toss the chicken in the marinade to coat it thoroughly. If using a ziplock, try to squeeze most of the air out, and marinate the chicken in the fridge for 1 hour (longer is fine).
3. Make the salsa: mix all ingredients in a bowl. Salt and pepper to taste. Place bowl in the fridge to let the flavors meld.
4. Cook the chicken on medium heat in a heavy skillet or a grill pan in batches, seasoning with salt and pepper as you go. Cook until golden brown on all sides and the interior is cooked through, about 4-8 minutes/side for white meat, 6-10 minutes/side for dark meat.
5. Serve chicken with salsa over it. For a more substantial meal, complement with quinoa, wild rice, or couscous.
Saturday, February 20, 2010
Roasted pork loin

Roasted pork loin always looks and tastes very impressive, yet it's ridiculously easy. There are three basic steps: sear, glaze, and roast. If you have an oven-friendly skillet, it's a one-pan dish.
I used to be not much of a pork fan, and I still rarely order it out, but I've been warming up to cooking it. It's easy to make it taste good, it's a cheap meat, and it doesn't have to be unhealthy - it all depends on the preparation. It's also extremely versatile - great with spicy, salty, and sweet flavors.
For roasted pork loin in particular, the glaze is where you can unleash your creativity and make the dish your own. It can be mustard, jam, a simple mix of olive oil, rosemary, and thyme, or a wine reduction sauce with spices and herbs (which is not as hard as it sounds - just deglaze the pan with red wine after searing your pork, add desired aromatics and reduce by half the volume).
In the case of the pork loin in the picture, S and I made it on a fairly busy night, so the glaze was an apricot chili pepper jam that was hanging out in the fridge. I highly recommend any sort of fruit jam - it will caramelize nicely in the oven.
As for the side, I like serving pork loin with oven-roasted hearty vegetables (potatoes, parsnips, carrots, turnips, brussels sprouts, etc: just add whole garlic cloves, toss everything with olive oil, salt, and pepper, and bake in a 400 F oven for ~40 mins). Cheesy polenta or garlicky mashed potatoes would work too if you feel like something creamier.
For beverage pairings, go with an "old world" (i.e. more earthy than fruity) pinot noir. If you are beer fan, go with a farmhouse/saison ale.
So, here's the "recipe" (more of a framework):
INGREDIENTS
pork loin
pepper
glaze (apricot chili jam in this case)
olive oil or butter
METHOD
1. Preheat the oven to 400 F. Heat up an oven safe skillet (or any thick pan) on medium-high and add olive oil or butter (I use olive oil, because I like its taste, but butter's more traditional for pork). Sear pork loin on all sides until the skin is browned, peppering as you go.
2. Lay the pork loin fat side down in the skillet (or a baking dish if your skillet is not oven-safe). Apply the glaze liberally to the top and sides, using a basting brush or a silicone spatula.
3. Place in the oven and roast for 30-40 minutes (depending on the size of the cut). Take out of the oven and let rest for ~10 minutes.
4. Slice into medallions and serve.
Kefir

This post is about kefir. Why? Because it's awesome, and if you haven't tried it, you should.
Kefir has been rapidly gaining popularity in the States, and you can find it in most supermarkets (especially the kind produced by Lifeway, pictured below).

So what is kefir?
It is fermented milk - kind of a middle point between milk and yogurt. It is fermented using something called "kefir grains": cauliflower-shaped combinations of specific bacteria and yeasts, mounted in a mix of lipids, sugars, and proteins.

The precise composition of these grains distinguish kefir from other dairy drinks, most of which are not well known in the US (prostokvasha, ryazhenka, ayran, varenets, acidophilin, katyk, gamyk, to name a few...) They are quite widespread in Eastern Europe and the Caucasus, and growing up in Russia, I got to experience a couple of them. Unfortunately, I can't say much about the distinguishing characteristics of their taste, because I foolishly despised them all as a kid.
Thankfully, I've since realized the error of my ways. Kefir is delicious! It tastes like slightly sour liquid yogurt. It's perfect with cereal (that is my breakfast almost every day) and makes a great snack with fruit. It has the ideal consistency and flavor notes for making amazing smoothies (I recommend trying it with a berry medley).
Speaking of berries, if you see plain kefir is your store, you will likely find a few berry-flavored types there as well. I personally go for the low-fat plain one, because it's the most versatile, and I'd rather add my own berries if the mood strikes me.
Kefir is not only tasty, it is also quite healthy for you. It is high in calcium, protein, and folic acid. As any fermented milk product, kefir is probiotic and thus good for the digestive system (the bacteria in kefir help restore the microfloric equilibrium in your tummy). It does not cause an adverse reaction in lactose-intolerant people - in fact, the active bacteria in it can help lactose digestion. Finally, there are some claims about its anti-oxidant and anti-mutagenic properties, but I find those dubious, so take that with a grain of salt.
Anyhow, if you have never tried kefir before, I hope that I convinced you to at least give it a go. You won't regret it =)
Friday, February 19, 2010
Bison Moussaka

To start things off, a hearty dinner recipe that S and I made recently. We decided to jazz up this traditional Greek dish by using ground bison meat instead of traditional lamb, but we've tried it with lamb before, and it's delicious. Ground beef would work here as well. We've also lightened this fairly significantly (bison is a lean meat, and we used nonfat yogurt, and a small amount of oil).
A few words about moussaka. It's basically a casserole on crack: layers of veggies (eggplant, potato, green pepper), interleaved with layers of ground meat sauce (cooked with tomatoes and spices). It is usually attributed to Greece, but as with most dishes hailing from the Balkans, many cultures have their own variants (according to wikipedia, "all the cuisines of the former Ottoman region" do). Seems that this recipe is mostly Greek-influenced in at least its structure, because it is layered and topped with a yogurt-based sauce.
Bison Moussaka Recipe
INGREDIENTS
Meat sauce:
2 tablespoons olive oil
1 pound ground bison (or any other ground red meat)
1 large chopped onion
3-6 cloves garlic, mincedjavascript:void(0)
2/3 cup dry red wine
2 teaspoons red chili powder
1 28-ounce cans tomatoes, drained (can be chopped or left whole for a more rustic feel)
1/4 cup dried currants
2 tablespoons tomato paste
Pinch of ground nutmeg
Pinch of allspice
(Optional) Pinch of cinnamon (we did not use it)
Other layers:
2 large green bell peppers, seeded, cut into 1/2-inch pieces
2 medium eggplants (about 1.5 pounds total), cut lengthwise into 1/4-inch-thick slices
2 teaspoons sea salt
1 large russet potato, cut into 1/4 inch slices (submerge in cold water after cutting to prevent browning)
olive oil
Yogurt topping:
2 cups Greek yogurt (we used nonfat Fage. Greek-style yogurt is best, but any plain yogurt could potentially be substituted)
2 large egg yolks
METHOD
1. Heat 2 tablespoons olive oil in heavy-bottomed skillet or Dutch oven over medium-high heat. Add peppers, sauté until tender and beginning to color, about 6-8 minutes. Transfer peppers to bowl and set aside.
2. Heat 2 tablespoons olive oil in same skillet over medium-high heat. Add ground meat and sauté until cooked through, breaking up with back of spoon, about 6 minutes.
3. Add onion and garlic, sauté until onion is tender, about 6 minutes. Add wine and chili powder and cook 2 more minutes. Stir in tomatoes, currants, tomato paste, nutmeg, and allspice. Reduce heat to medium. Cover and simmer until sauce is very thick, stirring occasionally, about 40 minutes. Season to taste with salt and pepper.
4. In the meantime, line large baking sheet with foil. Arrange eggplant slices in layers on prepared sheet, sprinkling each layer with sea salt. Let stand at room temperature for 30 minutes. (This step gets rid of excess moisture in eggplant, but it is not completely necessary and could be skipped).
5. Preheat broiler. Pat eggplant slices dry with paper towels. Remove eggplant from the baking sheet so that only a single layer of slices is left. Brush lightly with olive oil on both sides, broil until golden brown, about 4 minutes per side. Transfer to platter. Repeat with remaining eggplant.
6. Preheat oven to 400°F. Coat 13x9x2-inch baking casserole with oil. Drain potatoes and arrange in bottom of dish. Arrange half of eggplant slices over potatoes. Pour half of the meat sauce over. Arrange sautéed peppers over sauce. Arrange remaining eggplant over peppers. Pour remaining sauce over.
7. Bake moussaka until bubbling around edges, about 45 minutes. Whisk yogurt and egg yolks in medium bowl to blend. Pour over moussaka, covering completely. Bake until yogurt topping is softly set, about 15 minutes. Transfer baking dish to rack and let stand 20 minutes.
8. Spoon moussaka onto plates.
Serves 6.
This recipe can be prepared ahead of time, cooled, and refrigerated. Reheat in 400 F oven or in the microwave.
Greetings!
I started this blog, because I think about food a whole lot (especially if it contains garlic, but not necessarily). Cooking it, eating it, experimenting with new ingredients, trying new restaurants, et cetera - I have a lot of tasty thoughts, and I wanted to write them down. Besides, I am a busy neuroscience grad student, and I needed a constructive way to procrastinate.
I plan to primarily post about recipes I have tried and liked, though I may occasionally post about restaurants or kitchen gadgets... who knows!
Hope you find something useful and/or interesting here =)
Bon appetit!
I plan to primarily post about recipes I have tried and liked, though I may occasionally post about restaurants or kitchen gadgets... who knows!
Hope you find something useful and/or interesting here =)
Bon appetit!
Subscribe to:
Posts (Atom)